
vRealize Automation 7 : Delete Stale Virtual Machine Records Using Cloud Client
This blog post talks about how to remove stale / hung virtual machine records from vRealize Automation 7.x. While in vRA 5.x /6.x, we had SQL scripts to do the same action, in vRA 7.x the same can be done with the power of Cloud client 4.1. Cloud Client is really a powerful and cool tool for further automating vRA tasks. And this blog will show why it's so Powerful!
Scenario / Use-case :
You may have come across a situation, wherein due to some failures during provisioning, virtual machine record doesn't clear out completely and this can cause issues. The major one is , this entry blocks an IP address in Network Profiles and occupies resources in Reservation.
I also hit the same issue recently while working on vRA7- NSX integration. The ideal way out is to use GUI for deleting these stale entries, but LUCKILY, it didn't work for me and I got the chance to explore the recently added function"forceunregister" in Cloud Client 4.1. I will first talk about using the GUI for doing this action.
Using GUI:
The recommended way is to use GUI for removing these records and the process is as below.
- Navigate to Infrastructure > Managed Machines.
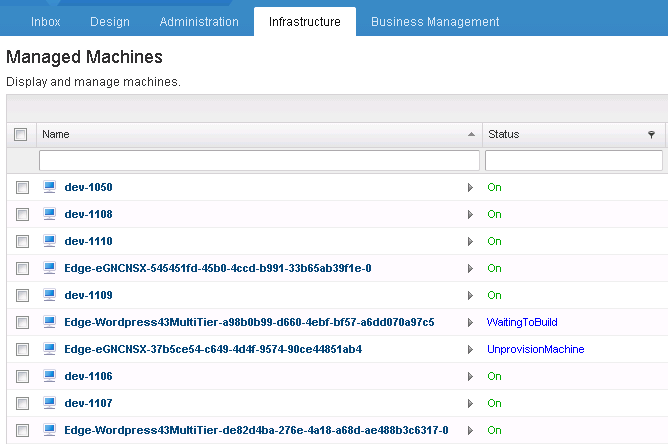
- Select the entry to be deleted. In my case it was "Edge-eGNCNSX-37b5ce54-c649-4d4f-9574-90ce44851ab4"
- Right-click the entry and select Destroy.

- Make sure the entry is selected and Click OK.

- Ideally, the entry should have been deleted, but it didn't.
Using Cloud Client 4.1:
- Download cloud client from the below link.
- Cloud Client 4.1
- Navigate to Bin folder of Cloud client and you would find Cloudclient.bat file.

- Run the bat file as Administrator.

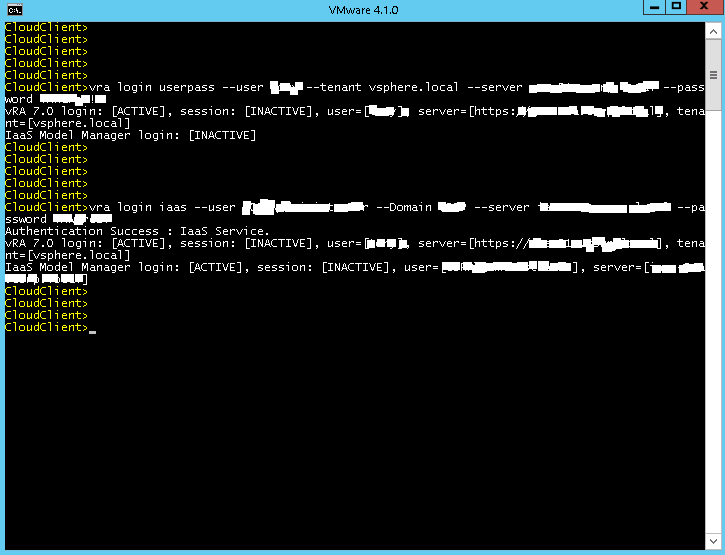
- Now login with the user which has admin rights into vRA appliance.
vra login userpass --user Admin ID --tenant Tenant Name --server vRA FQDN --password Password

- Once logged in, now log in using domain service account into IaaS machine.
vra login iaas --user service account --Domain domain --server manager server --password Password
- Now execute the command vra machines forceunregister --name Entry to be removed.

- This does the desired MAGIC!!! The entry gets deleted from Managed Machines.

- This action also clears and removed the reserved IP address from Network Profiles.
- This will not delete the Virtual Machine from vCenter. So, you will have to delete the Virtual machine manually from vCenter.
I hope this post helps you in removing unwanted entries and keeping vRA clean.
No comments:
Post a Comment