Showing posts with label vRealize Automation. Show all posts

Monday, 30 May 2016

vRealize Automation 7 : Delete Stale Virtual Machine Records Using Cloud Client

vRealize Automation 7 : Delete Stale Virtual Machine Records Using Cloud Client


This blog post talks about how to remove  stale / hung virtual machine records from vRealize Automation 7.x. While in vRA 5.x /6.x, we had SQL scripts to do the same action, in vRA 7.x the same can be done with the power of Cloud client 4.1. Cloud Client is really a powerful and cool tool for further automating vRA tasks. And this blog will show why it's so Powerful!

 Scenario / Use-case


You may have come across a situation, wherein due to some failures during provisioning, virtual machine record doesn't clear out completely and this can cause issues.  The major one is , this entry blocks an IP address in Network Profiles and occupies resources in Reservation.

I also hit the same issue recently while working on vRA7- NSX integration. The ideal way out is to use GUI for deleting these stale entries, but LUCKILY, it didn't work for me and I got the chance to explore the recently added function"forceunregister" in Cloud Client 4.1. I will first talk about using the GUI for doing this action.


Using GUI:


The recommended way is to use GUI for removing these records and the process is as below.

  • Navigate to Infrastructure > Managed Machines.
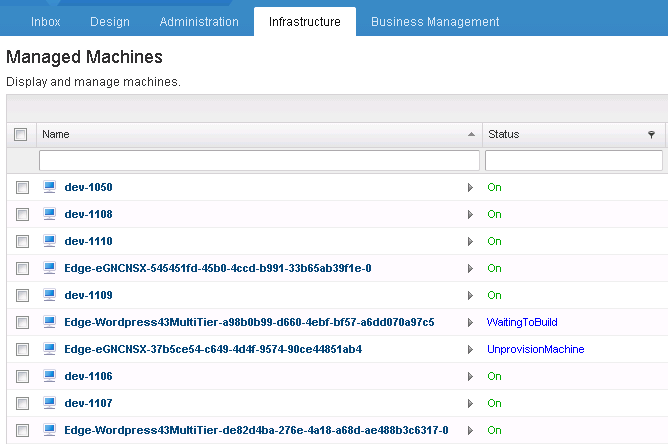
  • Select the entry to be deleted. In my case it was "Edge-eGNCNSX-37b5ce54-c649-4d4f-9574-90ce44851ab4"
  • Right-click the entry and select Destroy.

  • Make sure the entry is selected and Click OK.

  • Ideally, the entry should have been deleted, but it didn't.

Using Cloud Client 4.1:

  • Download cloud client from the below link.
  • Cloud Client 4.1
  • Navigate to Bin folder of Cloud client and you would find Cloudclient.bat file.
  • Run the bat file as Administrator. 

  • Now login with the user which has admin rights into vRA appliance.
vra login userpass --user Admin ID --tenant Tenant Name --server vRA FQDN --password Password


  • Once logged in, now log in using domain service account into IaaS machine.
vra login iaas --user service account --Domain domain --server manager server --password Password
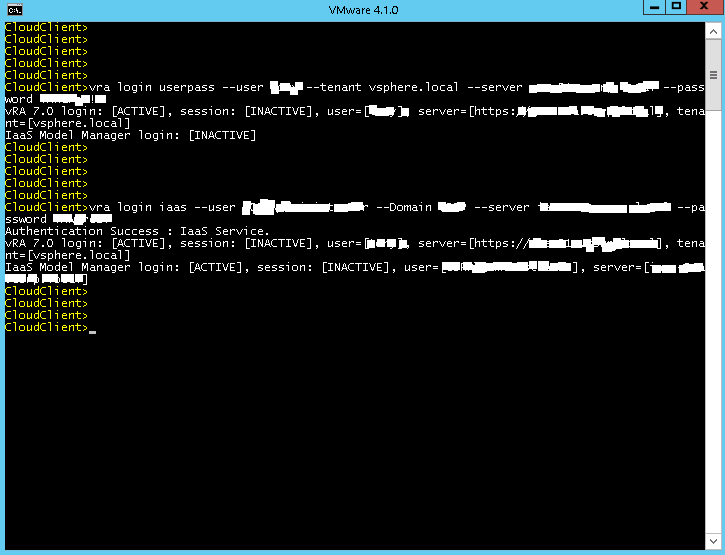
  • Now execute the command vra machines forceunregister --name Entry to be removed.

  • This does the desired MAGIC!!! The entry gets deleted from Managed Machines.

  • This action also clears and removed the reserved IP address from Network Profiles.
  • This will not delete the Virtual Machine from vCenter. So, you will have to delete the Virtual machine manually from vCenter.

I hope this post helps you in removing unwanted entries and keeping vRA clean.


Tuesday, 12 January 2016

vRealize Automation : Why my VM provisioning request got Rejected?

vRealize Automation Version: 6.x

One thing that I have thoroughly enjoyed and has given me immense satisfaction over the years as a field guy is finding interesting use-cases and providing the solutions for the same.

Use-case:

Everything was going smooth until, in UAT, we found an interesting issue. There is no way in vRealize Automation GUI can a requester see the "Bussiness Justification" after his request gets rejected. The vRA version that I am referring here is 6.2.2, but it is seen in earlier versions as well.

While technically it may seem to be a small issue, but from business point of view it posed many challenges some of which Client highlighted as:
  • Since requester doesn't know why his request was rejected, he would repeat the mistake.
  • Even cloudadmin has no visibility of why a particular request was rejected or approved.
  • The bigger roadblock was Auditing, since it was a bank, they wanted to keep track of rejections and most importantly approvals of requests with high resources.
If you are new to vRA or would like to understand its components and constructs, I would recommend you to go through these useful blogs:


Solution:

The solution was quite tricky and bit complex. All Service Request(SR) related details like SR id is stored in catalog-service , while the approval related is stored in approval-service. So the way to retrieve the "Business Justification" and "Approver Detail" was to first make REST calls to catalog-service , store details and then using these details make another REST call to approval-service. I tried these stuff using the REST client and it worked perfectly. Now the next big step was to automate these REST calls and expose to Cloudadmin / Requester as a Catalog Service.

High-Level Steps:

  • Leverage vRealize Orchestrator(vRO) and develop vRO workflows to make REST calls.
  • Make a parent vRO workflow which would be called from vRA.
  • Create and Advance Service Designer(ASD) to call the parent workflow.

Low-Level Steps:


vRO:

  • Register a REST host in vRO by navigating to Library -> HTTP-REST-> Configuration -> Add a REST host.
  • Now add a REST operation by executing Add a REST operation workflow. 
                 Values to copy:
               a.  Name  :  Request-Token
               b.  Template URL : /identity/api/tokens
               c.  Content Type : application/json
               d.  HTTP Method : POST
  • Now Execute a Generate a new workflow from a REST operation for getting token ID/Authentication of vRA session.
  •  Now Add second REST operation for getting PreApproval id by executing the same workflow as in step 2
                  Values to copy:
               a.   Name: GetPreApprovalId
               b.  Template URL: /catalog-service/api/consumer/requests?   limit=1&page=1&%24filter=requestNumber+eq+{SRNumber}
    • Generate a new workflow by executing the Generate a new workflow from a REST operation for getting approval ID.
    •  Register the 3rd REST operation.
                        Values to copy:
                   a. Name : GetDetail.
                   b. Template URL : approval-service/api/info/approvals/{preApprovalId}


      • The script which will extract "Business Justification" and "Approver's Email ID" is:
                                 var jsonResponse = JSON.parse(contentAsString);
                                            var groups = jsonResponse.pastLevel;
                                                            for each (group in groups){
                                                              var requests = group.request;
                                                                  for each (req in requests) {
                                                                     var busJust = req.businessJustification
                                                                     var approver = req.completedBy
                                                                       }

                                                 System.log("Approvers is: " + approver);
                                                 System.log("BusinessJustifaction is: " + busJust);
                                                 }
                       
      •  The final parent workflow should look something like this.


      • Develop above workflow in such a way that it should have only 1 input i.e SR Number and 2 Outputs as shown below.


      vRA:


      • Login to vRealize Automation portal and navigate to Advanced Services tab and Add a new service blueprint.
      • Map it to the parent workflow created in vRO.
      • Edit "srnumber" input field to make it more descriptive, for ex "Request Number".
      • Create an Output field to capture "Business Justification" and "Approver's Email ID".
      • Give proper Entitlement as per need.
      That's it. Now let's see it in Action.

      • Login to vRA and go to Catalog, you would see something like this.

        • Request the Catalog as:

        • Go to Request and see the MAGIC!!


          I hope that you will find this useful!

          Stay tuned for more DeepDives.